Okay, Here’s the Story (and Yes, There’s a Story)
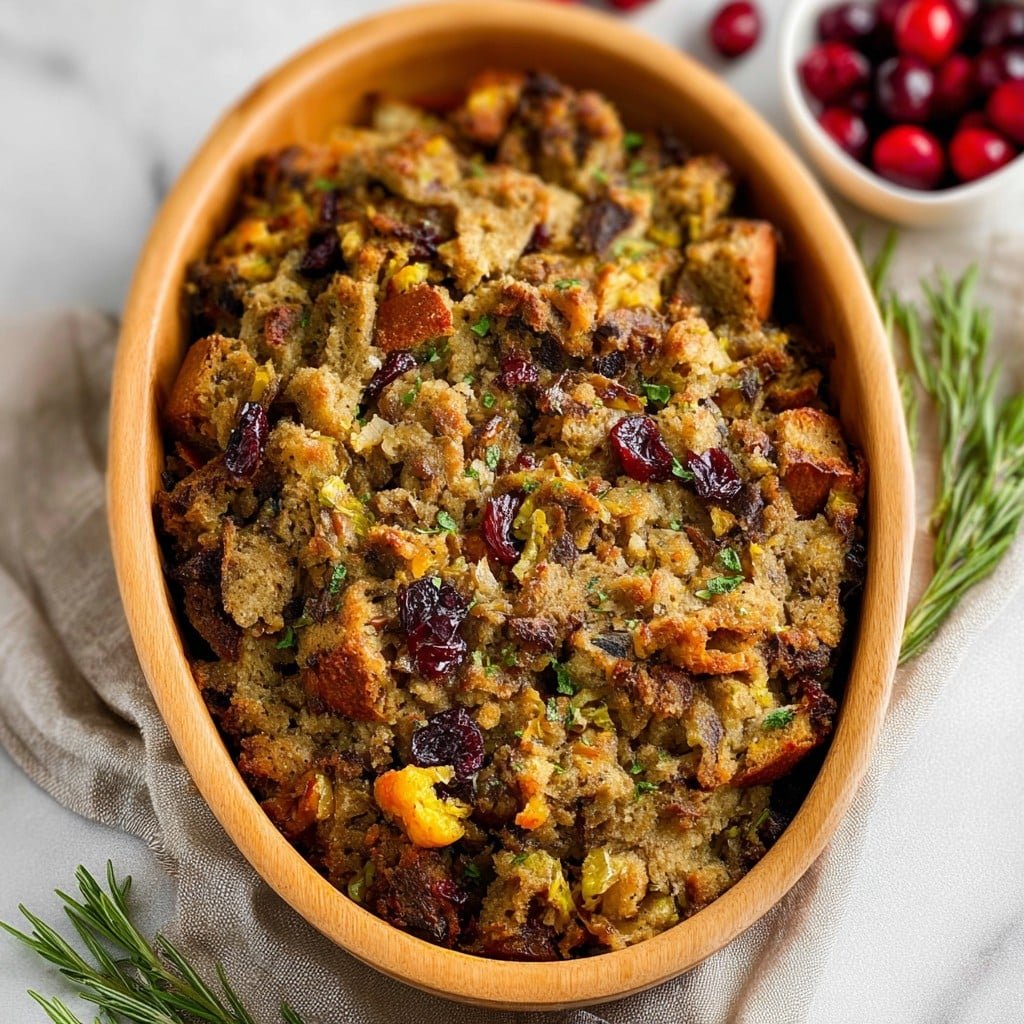
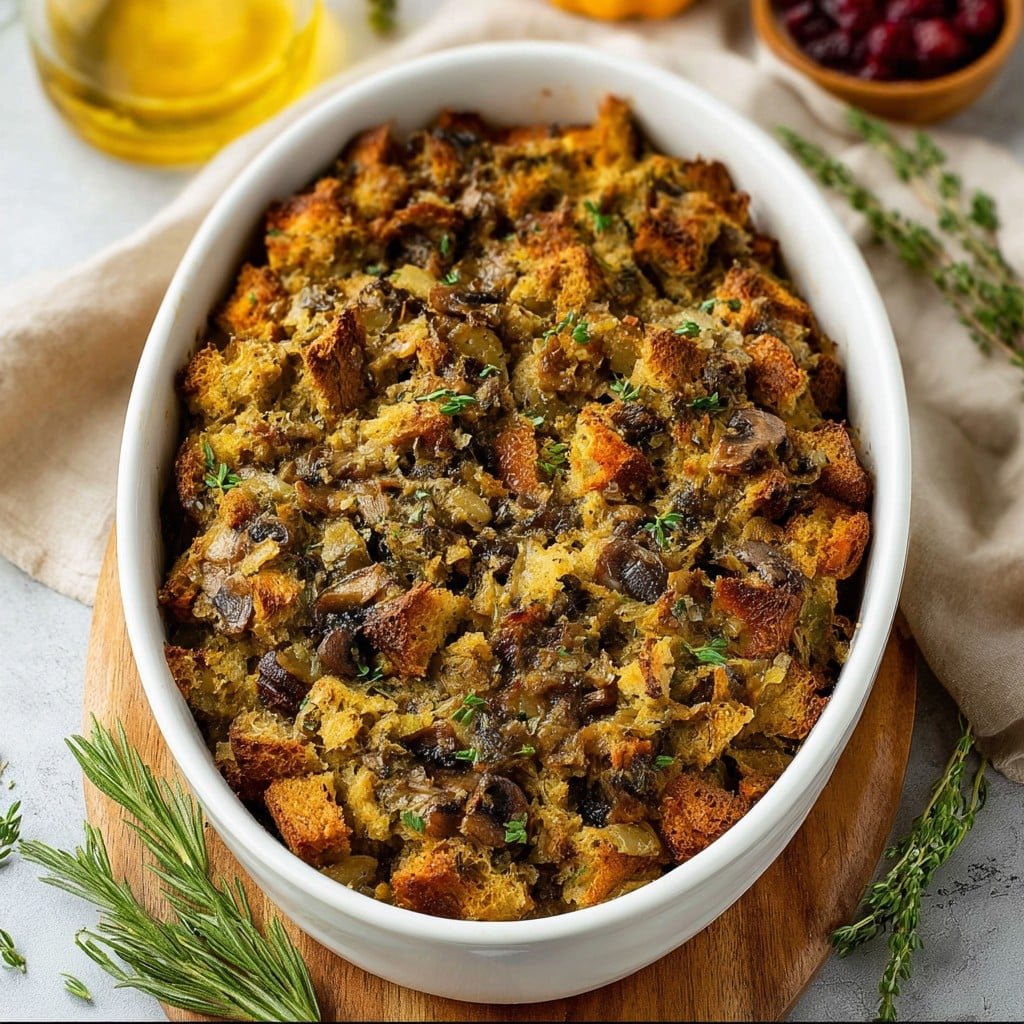
You know how some recipes have that magic—they just work? Well, maybe not the first three attempts… but this gluten-free paleo stuffing honestly feels like one of my proudest home-cook accomplishments. The first time I made it, everything kind of fell apart (literally; my “bread” was more like crumble), but I served it anyway at one of those too-much-family-at-the-holidays meals where people forgive almost anything as long as you pour them decent wine. My uncle still brings up the soggy bits, but hey, everyone remembers it, right? And now, after more little tweaks than I’d like to admit, this stuffing is where my heart (and most of my autumn weekends) lie. Trust me, you won’t miss regular bread one bit.
Not to digress, but the first time I grated celery instead of chopping because I got distracted, and you know what? Wasn’t half-bad. So basically, this recipe is forgiving. Plus, my dog insists on “helping” every year (mostly by taste-testing from the floor), so if you’ve got chaos going on in your kitchen, you are in the right place.
Why This Ends Up on My Table Every Single Year
I make this stuffing whenever my family starts dropping heavy hints about “missing that weird bread thing you do.” (No, I don’t find that passive-aggressive at all; thanks, Aunt Joan.) It’s comfort food that doesn’t mess with my stomach, and even one of my gluten-loving cousins said—and I quote: “Wait, this isn’t regular stuffing?” Feel free to toss in whatever veggies you’ve got, but don’t overthink it. If things get a bit crispy, that’s the best part to me anyway.
Honestly, sometimes I make it with whatever’s on hand, so if you’re feeling a bit loosey-goosey about the rules (who isn’t during the holidays?), this will work for you. And, if I’m being real, the biggest frustration was finding a gluten-free bread that didn’t taste like sawdust. Finally settled on making my own—but more on that below.
Stuff You’ll Need (and What I Usually Swap)
- Gluten-Free Paleo Bread – A loaf (about 350g). Use your favorite, or try this paleo bread recipe. When I’m short on time, I use Simple Mills (my grandma always insisted on homemade, but honestly, shop-bought works too).
- Onion – One, medium. Red or yellow, both fine.
- Celery – 3 stalks. Or more—my family loves the crunch. Grated once (by accident) and survived.
- Carrot – One big one or 2 small. Sometimes I skip if I don’t have any.
- Apple – One, diced small. Adds that chew. My sister omits, says it’s too “pie-like.” I disagree.
- Fresh Herbs – A handful parsley, thyme, and sage. Dried herbs work in a pinch—about 2 tsp each.
- Chicken or Veggie Broth – 1 cup (250 ml). Sometimes I pour in a bit extra if it looks dry; totally eyeball it.
- Eggs – 2, large. (Don’t panic if you’re short, just use one, it’ll still stick.)
- Olive Oil or Ghee – A nice big glug. Butter works too if you’re not too paleo about it.
- Salt and Pepper – To taste, which basically means however much you fancy.
- Optional: Mushrooms (sauté first), toasted pecans, dried cranberries. I’m a nut for pecans, but use whatever won’t start a family fight.
Here’s the Not-Too-Fancy Way I Make It
- First up, cube your bread. Go for 1 cm chunks or bite-ish size; I’m not measuring with a ruler here. Lay them out on a baking tray and bake at 150°C (300°F) for about 20 mins to dry them—it’s kind of the backbone of this stuffing, and if you skip this they get a bit sloshy. I did that once, never again.
- Meanwhile… Heat a large pan on medium, splash in your oil or ghee, and tumble in onion, celery, and carrot. Fry for 8 minutes or until things are softening and maybe just thinking about caramelizing, but don’t hang around forever, we don’t need a soup.
- Add apple and herbs. Stir for another 2 minutes (this is where I sneak a taste—but it’s pretty hot so, careful.) Drop in the cranberries, nuts, or mushrooms if you’re using.
- Bread meets veg time. Tip dried bread cubes into a big mixing bowl. Pour cooked veggies over. Give a good stir. If it all seems a bit dry, don’t stress—we add broth next.
- Mix eggs and broth in a jug. Whisk together, then pour over the bowl. Combine gently. It’ll look like a weird bread salad—don’t worry, it always does at this stage.
- Transfer to a greased baking dish, smooth it out, and cover with foil. Bake at 180°C (350°F) for 25 minutes, then ditch the foil and bake 10-15 mins more. You want golden edges, and maybe someone arguing over which corner is crispiest. Side note: If you want it super golden on top, stick under grill for a couple mins—but watch it like a hawk. Trust me.
Notes I’ve Learned the Hard Way
- Testing different paleo breads is worth it; some disintegrate. Actually, freezing and thawing the bread first gives a better bite, for reasons I don’t quite understand.
- Don’t drown it in broth. But also, too dry is worse. You kind of have to play Goldilocks here.
- I sometimes toss in extra herbs on top for color, but they just crisp up and look a bit sad. Your call.
Stuffing Variations I’ve Fiddled With
- Sausage version: Brown up about 200g of good sausage, break it up, and mix in with the veggies. Next-level cozy. Only downside—I once used Italian sausage and the fennel kind of took over, so, maybe stick with plain.
- Mushroom-heavy: Swap out half the bread cubes for oven-roasted mushrooms. My brother hated it, but I honestly kind of liked the squishiness.
- All-dried herbs: After running out of fresh, I tried only dried herbs. Not bad, but felt like it needed a splash of lemon (which fixed it up fine).
Gear You (Probably) Need
- Big mixing bowl—if you don’t have one, I once used a soup pot and it did alright.
- Frying pan—nonstick if your onions like to cling on.
- Baking dish—roughly 9×13 inch, or whatever’s not in the dishwasher.
- Whisk or fork. For the eggs. Actually, I’ve used just a spoon in a pinch.
Don’t sweat the fancy gear; it’s more about what fits in your oven, in my opinion.
How Long This Will Last (Not Long in My Place!)
If, and this is a big if, you end up with leftovers, they’ll keep in the fridge 3 days. I usually just pile them into a glass container, lid slightly askew (not proud of that part). Reheat in oven or microwave. To be honest, it tastes even better cold, but maybe that’s just nostalgia talking. Oddly, I’ve never had it last longer than a day because somebody always sneaks bites from the fridge.
How To Serve (and a Family Quirk)
My favorite thing? Serve this piping hot beside roast chicken (or turkey—classic), but one Christmas I put it alongside roast pumpkin for my vegetarian cousin and she freaked out—in a good way. I usually sprinkle extra parsley on top so it looks all proper. And if you like gravy, go for it. I, er, sometimes eat a sneaky bowl on its own while everyone’s outside doing stuff like arguing about rugby.
Lessons Not To Forget (The “Ouch” Wisdom)
- Once, I rushed the bread-drying, and ended up with a pudding disguised as stuffing. Take it slow.
- Taste the veggie mix before you add egg. That’s when you can tweak the salt.
- If you go heavy on apple or cranberries, it’d be a bit like dessert. Learned that one the hard way at a Friendsgiving.
Real-Deal FAQ (Because People Really Ask Me)
- Can I make this ahead?
- Yup! I usually get to the “ready to bake” stage, wrap it, and stash in fridge overnight. Just let it warm up on the counter, add a splash of broth if it looks dry, and bake as usual.
- Can you freeze this stuffing?
- You can, but it’s best if you use a bread that doesn’t get soggy. On second thought, leftovers—in the rare case you have some—are better just eaten out the fridge.
- Is there a nut-free version?
- Of course! Just skip the pecans or swap for sunflower seeds. My friend’s son is allergic, so I always do this for them and nobody notices.
- What about vegan?
- Trickier, but you can skip eggs (just up the broth a little and add some flax “eggs”). Didn’t rise as much, a bit denser, but still tasty. For more vegan swaps, I like perusing Minimalist Baker’s vegan guides.
- My bread fell apart; what did I do wrong?
- Oh mate, been there. It’s usually the bread—either cubes weren’t dried enough or too old. Next time, dry out longer and use a sturdy loaf. Or just call it stuffing crumble and pretend that was the plan!
Hope you love this gluten-free paleo stuffing as much as my hungry crowd does. And if you find a tweak that’s even better, let me know—I’ll be the first to admit there’s always room for improvement. If you need a quick paleo bread, I sometimes follow this recipe from Paleo Running Momma—she’s got some good tricks!
Ingredients
- 8 cups grain-free bread cubes (such as almond or cassava flour bread), cut into 1-inch pieces
- 2 tablespoons olive oil
- 1 medium onion, diced
- 3 celery stalks, diced
- 2 medium carrots, diced
- 3 cloves garlic, minced
- 2 teaspoons fresh sage, chopped
- 2 teaspoons fresh thyme leaves
- 1 teaspoon dried rosemary
- 1/2 teaspoon sea salt
- 1/4 teaspoon ground black pepper
- 2 cups low-sodium chicken or vegetable broth
- 2 large eggs, lightly beaten
Instructions
-
1Preheat the oven to 350°F (175°C) and grease a large baking dish.
-
2Spread the grain-free bread cubes in a single layer on a baking sheet and toast in the oven for 10 minutes, until lightly crisped.
-
3In a large skillet, heat olive oil over medium heat. Sauté onion, celery, and carrots for 6-7 minutes until softened. Add garlic, sage, thyme, and rosemary and cook for 1 more minute.
-
4In a large bowl, combine bread cubes, sautéed vegetables, salt, pepper, and broth. Gently stir in the beaten eggs until evenly coated.
-
5Transfer the stuffing mixture to the prepared baking dish. Cover with foil and bake for 30 minutes, then uncover and bake for an additional 10 minutes, until golden brown on top.
-
6Remove from oven and let cool for a few minutes before serving. Enjoy!
Approximate Information for One Serving
Nutrition Disclaimers
Number of total servings shown is approximate. Actual number of servings will depend on your preferred portion sizes.
Nutritional values shown are general guidelines and reflect information for 1 serving using the ingredients listed, not including any optional ingredients. Actual macros may vary slightly depending on specific brands and types of ingredients used.
To determine the weight of one serving, prepare the recipe as instructed. Weigh the finished recipe, then divide the weight of the finished recipe (not including the weight of the container the food is in) by the desired number of servings. Result will be the weight of one serving.
Did you make this recipe?
Please consider Pinning it!!

