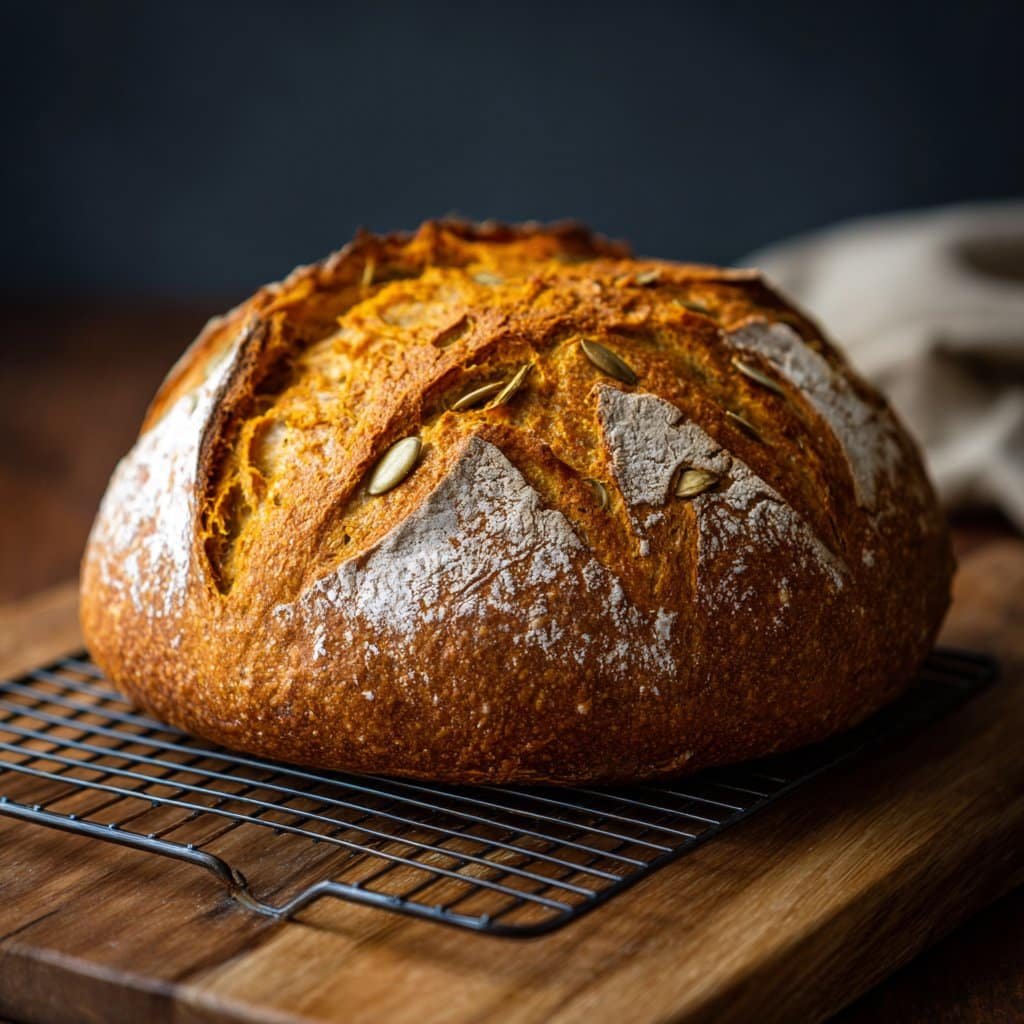
Alright, Let Me Tell You About My Pumpkin Sourdough Bread Obsession
You know the exact moment in autumn when the air gets that crispy edge and you start eyeing the canned pumpkin in the cupboard? That’s my cue. Pumpkin sourdough loaf bread is kind of my go-to for when I want the kitchen to smell like a hug (or when I bought too much pumpkin puree, again). I won’t pretend I nailed this the first time. Actually, the first loaf could’ve doubled as a doorstop, but now? Now it’s the reason my cousin shows up unannounced.
Funny story—last Thanksgiving, I was halfway through prepping this bread, realized I’d run out of flour, and swapped in a bit of rye. It turned out even better, which is wild. Anyway, if you’re after something cozy but not too sweet, this is it. Plus, making sourdough bread makes me feel like some sort of wizard, which never hurts.
Why You’ll Love This Pumpkin Sourdough Bread (Or At Least Why My Family Does)
I make this whenever I want breakfast to feel like a treat but don’t want to risk a sugar crash before lunch. My family goes a bit bonkers for it, mostly because it’s got that soft, pumpkin-y crumb and just enough tang (and if you toast it and slather on butter—oof, game over). I honestly resisted the whole sourdough craze for ages, mostly because those bubbly starters looked intimidating, but it turns out, it’s mostly just waiting. The only frustration is remembering to start early enough, but hey, you can’t rush deliciousness (believe me, I’ve tried).
Here’s What You’ll Need (And Some Options Because Who Has Everything?)
- 3 cups (about 400g) bread flour (sometimes I swap 1 cup for whole wheat; my gran was all about King Arthur, but honestly any bread flour works)
- 1 cup (about 250g) active sourdough starter (fed and bubbly—if yours is a bit sluggish, just let the dough rise longer)
- 1 cup pumpkin puree (NOT pie filling—unless you’re feeling wild, but results will vary)
- 1/4 cup lukewarm water (I forget to measure this half the time, but it does matter, so try to be precise)
- 2 tbsp olive oil (can sub melted butter or coconut oil—I’ve done both in a pinch)
- 2 tbsp honey or maple syrup (maple gives it a woodsy vibe; sugar works too, just dial it back a bit)
- 1 1/2 tsp salt
- 1 1/2 tsp pumpkin pie spice (sometimes I just shake in cinnamon and nutmeg, no biggie)
- Optional: a handful of pepitas or sunflower seeds for the top
How I Actually Make It (With Some Winging)
- Mix Stuff Together: In a big bowl, dump in the starter, pumpkin, water, oil, and honey. Give a good stir. Add in the flour, salt, and spices. I start with a spoon, then usually end up using my hand because that’s just easier. It’ll be sticky. Don’t panic.
- Let It Rest: Cover the bowl with a towel (or, in my case, sometimes a clean t-shirt when I can’t find a towel) and let it sit for about 30 minutes. This is called the autolyse, but really, it’s a fancy term for letting the flour soak up the liquid.
- Stretch and Fold: Every 30 minutes for about 2 hours, grab a handful of dough, stretch it up, fold it over itself, and turn the bowl. Do this 4 times per session. This is where I usually sneak a taste—don’t judge.
- Bulk Rise: Let the dough chill (not literally, keep it warm) for about 4-6 hours. If it’s cold in the house, I stick it near a radiator or even in the oven with just the light on. You want it puffy and about doubled.
- Shape: Plop the dough on a floured surface. Shape it into a loaf-ish shape (oval or round, up to you). Pop it in a loaf pan or a banneton if you’re fancy. Sprinkle those pepitas if you like.
- Final Rise: Cover and let it rise for another 1-2 hours (or overnight in the fridge if you’re into sour tanginess—actually, I find it works better if you do this).
- Bake: Preheat your oven to 220°C (425°F). If you’ve got a Dutch oven, great; if not, a regular loaf pan works. Bake for about 35-40 minutes (sometimes I peek at 30 just to make sure it’s not burning). The top should sound hollow when tapped, or at least not squishy.
Some Notes I Learned the Hard Way
- If your starter isn’t as bubbly as you’d like, just give everything extra time. Patience is the secret sauce.
- The dough will be stickier than regular sourdough. It’s the pumpkin. Embrace it.
- If you forget the salt (I’ve done it), it’ll taste a bit flat, but still edible. Butter helps.
Things I’ve Tried (And, Erm, One I Wouldn’t Repeat)
- Swapping in sweet potato puree: actually pretty good, especially with pecans on top.
- Adding chocolate chips: my kids loved it, I preferred it plain, but you do you.
- Once tried swirling in cream cheese before baking; it looked cool but was a gloopy mess—maybe don’t try that one unless you love chaos.
If You Don’t Have the Usual Gear
No Dutch oven? No big deal. I’ve made this right in a regular bread pan, or even shaped it free-form on a cookie sheet lined with baking paper. A banneton is nice for fancy lines, but a bowl and a tea towel dusted with flour work just fine. Once, I even used a colander lined with parchment—worked better than I expected.
How to Store It (Though It’s Usually Gone Quick)
In theory, you should let it cool completely, slice it, and store in an airtight container for 2-3 days. But honestly, in my house it never lasts more than a day! If you want it to last, it freezes well—just slice first for easy toast later.
What to Serve With (And How I Like It)
I love this bread toasted with a smear of salted butter and a drizzle of honey—especially when it’s still a bit warm. For a proper autumn breakfast, a cup of milky tea and a slab of this is just the business. My uncle dunks it in his soup, which I thought was odd, but you know what? It works.
Pro Tips I’ve Learned (The Hard Way)
- Don’t skip the second rise—I once tried to rush this step and regretted it because my loaf turned out like a flat cap more than bread.
- If you forget to preheat the oven (yep, done that), the bread won’t rise right at the end. Go make a cuppa while it heats up; it’s worth it.
- Actually, I find it works better if you let it chill overnight in the fridge before baking. More flavor, plus it fits my lazy schedule.
Questions Friends Have Asked (And My Real Answers)
- Can I use canned pumpkin?
- Yep, that’s what I use. Fresh is lovely, but who’s got time for all that? If you do, hats off to you!
- Do I need a fancy sourdough starter?
- Not at all. Mine’s just water and flour that I keep alive with, um, occasional neglect. Here’s a solid starter guide from King Arthur if you want to start one.
- Help! My dough is so sticky!
- Pumpkin does that. Oil your hands or dust with extra flour. Or just embrace the mess (I do).
- How do I tell when it’s done?
- Tough one! Tap the top; it should sound hollow. Or use a thermometer (should read about 95°C/200°F inside—yeah, I use one from time to time, like this Thermapen which is a bit fancy but so good).
- Can I double the recipe?
- I’ve tried. My mixer wasn’t happy, but it worked. Just split into two loaves so it bakes evenly.
Oh, and one more thing—if you’re in the mood to take your sourdough game up a notch, I found the Perfect Loaf blog is packed with nerdy bread goodness. Fair warning, it’s a rabbit hole!
And that’s pretty much it. Hope your kitchen smells amazing and your loaf comes out better than mine usually does. If not, well, that’s what toast and butter are for, right?
Ingredients
- 1 cup active sourdough starter
- 2 cups bread flour
- 1 cup canned pumpkin puree
- 1/2 cup warm water
- 1/4 cup brown sugar
- 2 tablespoons olive oil
- 1 1/2 teaspoons salt
- 1 teaspoon ground cinnamon
- 1/2 teaspoon ground nutmeg
Instructions
-
1In a large bowl, combine the sourdough starter, pumpkin puree, warm water, and olive oil. Mix until well blended.
-
2Add the bread flour, brown sugar, salt, cinnamon, and nutmeg. Stir until a sticky dough forms.
-
3Knead the dough on a lightly floured surface for about 8-10 minutes, until smooth and elastic.
-
4Place the dough in a greased bowl, cover, and let rise in a warm place for 4-6 hours, or until doubled in size.
-
5Shape the dough into a loaf and place it in a greased loaf pan. Cover and let rise for another 1-2 hours.
-
6Preheat the oven to 375°F (190°C). Bake the loaf for 45-50 minutes, or until golden brown and sounds hollow when tapped. Cool before slicing.
Approximate Information for One Serving
Nutrition Disclaimers
Number of total servings shown is approximate. Actual number of servings will depend on your preferred portion sizes.
Nutritional values shown are general guidelines and reflect information for 1 serving using the ingredients listed, not including any optional ingredients. Actual macros may vary slightly depending on specific brands and types of ingredients used.
To determine the weight of one serving, prepare the recipe as instructed. Weigh the finished recipe, then divide the weight of the finished recipe (not including the weight of the container the food is in) by the desired number of servings. Result will be the weight of one serving.
Did you make this recipe?
Please consider Pinning it!!

