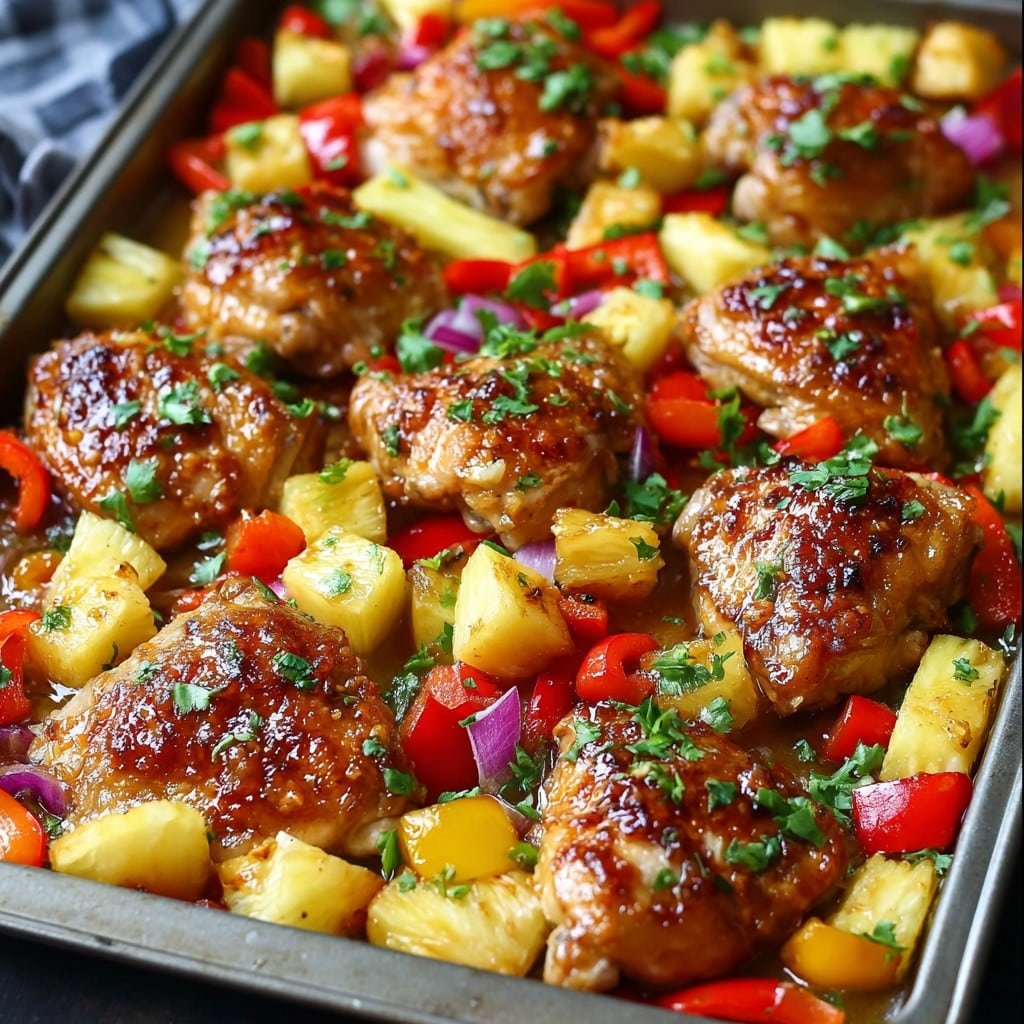
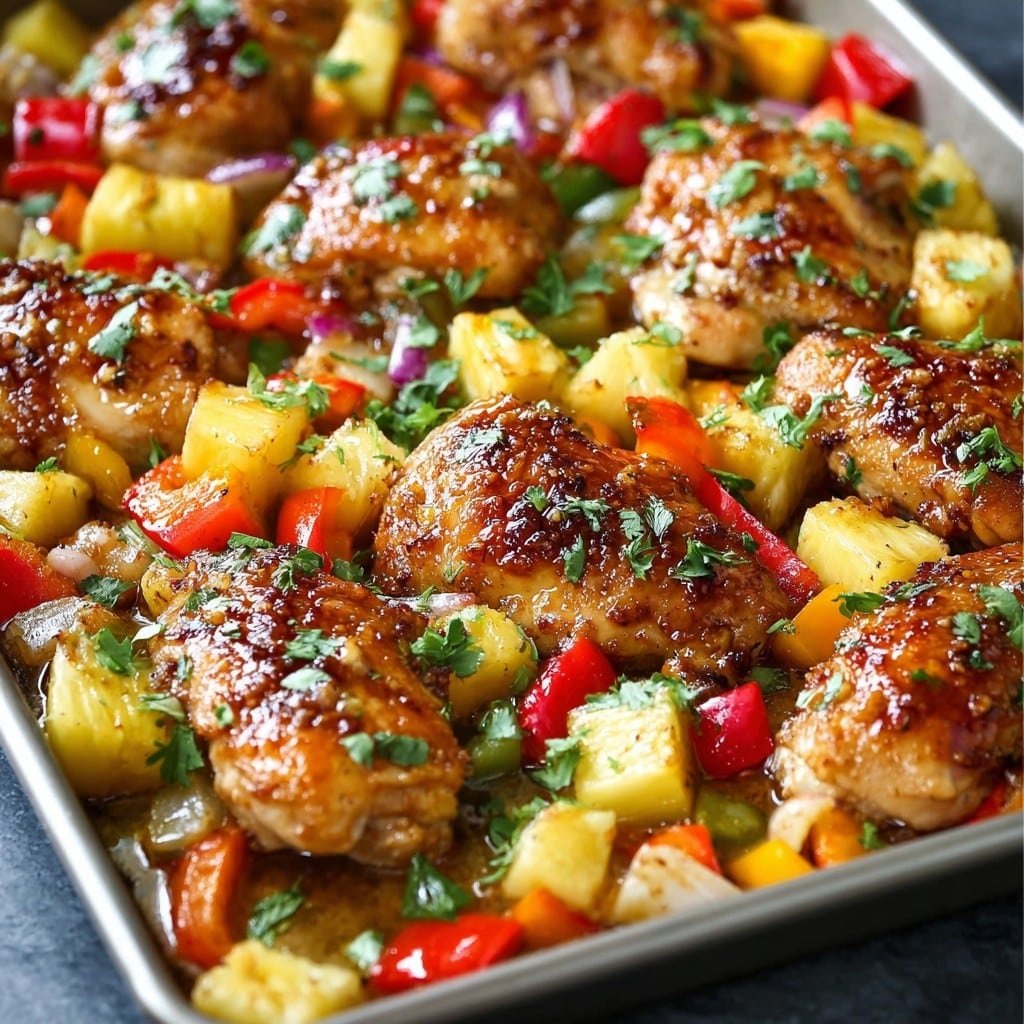
So, About This Sheet Pan Hawaiian Chicken…
Alright friend, let me tell you about the first time I tried making this Easy Sheet Pan Hawaiian Chicken with Pineapple and Peppers. It was honestly one of those Thursday evenings—kids were shouting, I’d just realized we were out of clean Tupperware (again), and my brain was about as crispy as yesterday’s toast. I remembered this recipe from a potluck my neighbor Karen threw years ago (she’s always posting about it on Instagram, but trust me, it’s much tastier than it is photogenic). Anyway, I cobbled it together using what was in the fridge, and now this thing just keeps popping up on our dinner table, like an old favorite hat you forgot you loved. Even my youngest, who claims to hate “fruit on dinner,” asked for seconds. Go figure.
Why You’ll Love This (Or At Least, Why I Do…)
I pull this out when I’m in no mood for fancy-pants cooking or two million dirty pans. The real magic? You toss everything on one pan, shove it in the oven, and—poof!—you have something that tastes like you tried way harder than you did. My family goes slightly bonkers for the pineapple bits; sometimes I double them just because otherwise there’s complaints (sibling bickering in my kitchen? Never…). Oh and if I forget to marinate the chicken first, somehow it’s still really flipping good.
Honestly, there was a patch when I felt weird about using canned pineapple—I guess there’s some foodie guilt about that—but come on, it’s so much easier! My one grumble used to be how the peppers would get soggy if I cut them too thin. Now I just accept they’ll never be as crisp as in a stir-fry, and life is a lot simpler for it.
Ingredients: With All My Usual Swaps
- 3-4 chicken breasts (or thighs, which are juicier—I use either, depends on what was cheaper that week)
- 1 red bell pepper, chopped in chunky pieces (sometimes I swap in yellow or orange, the flavor isn’t a big deal, but my grandmother once insisted on red—tasted the same!)
- 1 green bell pepper, also chunky
- 1/2 red onion, cut into large wedges—skip or add extra if you’re an onion fiend
- 1 can (about 400g/14 oz) pineapple chunks, keep the juice!
- 2-3 tbsp soy sauce (regular, low-sodium, or I’ve used coconut aminos in a pinch)
- 2 tbsp honey or brown sugar (my cousin swears by maple syrup but, sorry, not for me)
- 1 tbsp olive oil (or any neutral oil—I once used avocado oil and it was fine)
- 2 garlic cloves, minced—jarred garlic works when you’re tired, just saying
- 1 tsp ginger, grated or from a tube (skip if you must—it’s still good!)
- Salt and black pepper, to taste
- Optional: a splash of rice vinegar or lime for a tiny tang, or a shake of chili flakes if you want mild heat
Let’s Do This: Directions the Way I Actually Cook
- Preheat your oven to about 220°C (425°F). Give or take—if your oven runs hot just check a little earlier.
- Grab the chicken and, if you remembered, cut it into bite-sized pieces. If not, just throw the breasts/thighs on whole; you can slice after.
- Toss the chicken, peppers, onions, and pineapple chunks (juice too, don’t be shy) right onto a big ol’ sheet pan. Line it with foil or parchment if you like easier cleanup (I sometimes forget, and it’s…fine, just stickier).
- Drizzle on soy sauce, honey, olive oil, garlic, ginger, salt, and pepper. Mix with your hands (yep, hands—if you hate sticky hands a wooden spoon works ok, but you miss the joy, trust me).
- Spread it all out so everything has some breathing room. I sometimes panic at this stage because it looks like a mess, but it always sorts itself out.
- Bake for about 20-25 minutes if the chicken’s chopped up, or more like 28-30 if whole. Shuffle things halfway through so the edges don’t burn. This is where I steal a pineapple bit “to test.” (Yes, I burn my tongue every single time.)
- If you want everything super caramelized and a bit sticky, give it a final 3-5 mins under the grill (broiler). Watch it though—the sugar means it’ll go from magic to burnt toast in a blink.
Notes From Messing Up a Few Times
- Parchment or foil makes cleanup a breeze, but once, it caught on the oven fan and I nearly set off the smoke alarm. We survived. Just tuck the paper in!
- If you forget the soy sauce—guilty!—a dash of salt after baking saves it.
- Too runny? It thickens as it cools. Or reduce the sauce on the stovetop. I rarely bother.
Variations That (Mostly) Worked
- Shrimp instead of chicken: Delicious, but needed less time—20 minutes tops. Anything longer and they shrivelled up smaller than my patience on a Monday.
- All veggies, no meat: Works! Sweet potatoes are lovely tossed in, but you need to roast them a bit first or they’re still raw when everything else is done.
- Tofu: Um, I tried and it was weirdly soft (maybe I needed firmer tofu or to pre-bake it? Still working on it…)
Do You Need a Special Pan? (Well, Sort Of)
I use a basic sheet pan. Nothing fancy. If you’ve only got a glass baking dish or a bigger roasting tin, it’ll do—but stuff might stay wetter, so maybe crank up the oven a bit or leave it in longer. I once made the whole thing in a giant cast iron; it actually came out nicely charred, but you need to keep an eye on it. Here’s my favorite type of sheet pan if you need to pick one out.
Storing Leftovers (If They Even Exist)
In theory, keep any leftovers in a lidded container in the fridge for 2-3 days. Honestly, in my house it never lasts past lunch the next day—my partner’s a bit of a midnight snacker! I think the flavor deepens overnight, but maybe that’s just wishful thinking. If you’re really after pro storage advice, this freezable chicken guide is helpful (though I rarely freeze it myself).
How We Serve It (Your Table, Your Rules)
I usually go for fluffy rice—sometimes white, other times brown because I’m pretending to be healthy (though I drown it in sauce, so who’s kidding whom). Noodles are good too, or wrap it all up in lettuce leaves for a bit of crunch. My sister piles everything in a bowl with extra chili sauce on top. We once ate it with nothing but some tortilla chips and—actually, don’t do that, it was a mistake.
What I’ve Learned (Usually The Hard Way)
- Don’t rush the oven time. I tried pulling it early once; undercooked chicken is just…bad. Wait for golden edges. The smell tells you it’s ready anyway.
- You can’t skip the halfway stir. Otherwise, sugar burns and you spend ages scrubbing.
- Pineapple tidbits, not rings, mix better. I once used slices and it felt like a pizza gone rogue.
FAQs You Might Actually Have
Can I use fresh pineapple? Yep, and honestly, it’s great if you don’t mind the chopping. But if you’re like me, the canned stuff’s just easier and less mess.
What if I don’t eat soy? Try coconut aminos or tamari—they both work well. Or go wild and try a bit of Worcestershire (haven’t yet, but it’s on my list!)
Can I prep this ahead? Sure! I often chop everything and stick the pan in the fridge, then toss the sauce on right before baking. Actually, it works better if you don’t leave the pineapple sitting for too long—it makes things too watery.
Do the leftovers stay crispy? Eh, not really. Peppers soften as they chill, but I reheat them in the oven for a bit more texture (microwave’s fine, but you lose any crispy bits).
Why is my chicken dry? Probably overcooked it—trust yourself and check after 20 mins, not 30. Or add a splash more pineapple juice to the pan if it looks dry partway through.
If you want more sheet pan dinner ideas, Budget Bytes has a bunch I’ve enjoyed on lazy weeks.
And that’s pretty much it. Hope you give this Easy Sheet Pan Hawaiian Chicken Recipe with Pineapple and Peppers a go—don’t stress it, just have fun (and maybe set a timer so you don’t forget it in the oven like someone I know…)
Ingredients
- 1.5 lbs boneless, skinless chicken breasts, cut into 1-inch pieces
- 2 cups fresh pineapple chunks
- 1 red bell pepper, sliced
- 1 yellow bell pepper, sliced
- 1 red onion, sliced
- 3 tablespoons soy sauce
- 2 tablespoons honey
- 1 tablespoon olive oil
- 2 cloves garlic, minced
- 1 teaspoon ground ginger
- Salt and pepper to taste
- Cooked white rice, for serving (optional)
Instructions
-
1Preheat your oven to 425°F (220°C). Line a large sheet pan with parchment paper or lightly grease it with cooking spray.
-
2In a small bowl, whisk together soy sauce, honey, olive oil, minced garlic, ground ginger, salt, and pepper.
-
3Arrange the chicken pieces, pineapple chunks, bell peppers, and red onion in a single layer on the prepared sheet pan.
-
4Pour the sauce evenly over the chicken and vegetables, tossing gently to coat all pieces.
-
5Bake for 25 minutes, or until the chicken is cooked through and the vegetables are tender. Stir halfway through for even cooking.
-
6Serve hot over cooked white rice if desired, and garnish with fresh cilantro or green onions.
Approximate Information for One Serving
Nutrition Disclaimers
Number of total servings shown is approximate. Actual number of servings will depend on your preferred portion sizes.
Nutritional values shown are general guidelines and reflect information for 1 serving using the ingredients listed, not including any optional ingredients. Actual macros may vary slightly depending on specific brands and types of ingredients used.
To determine the weight of one serving, prepare the recipe as instructed. Weigh the finished recipe, then divide the weight of the finished recipe (not including the weight of the container the food is in) by the desired number of servings. Result will be the weight of one serving.
Did you make this recipe?
Please consider Pinning it!!

