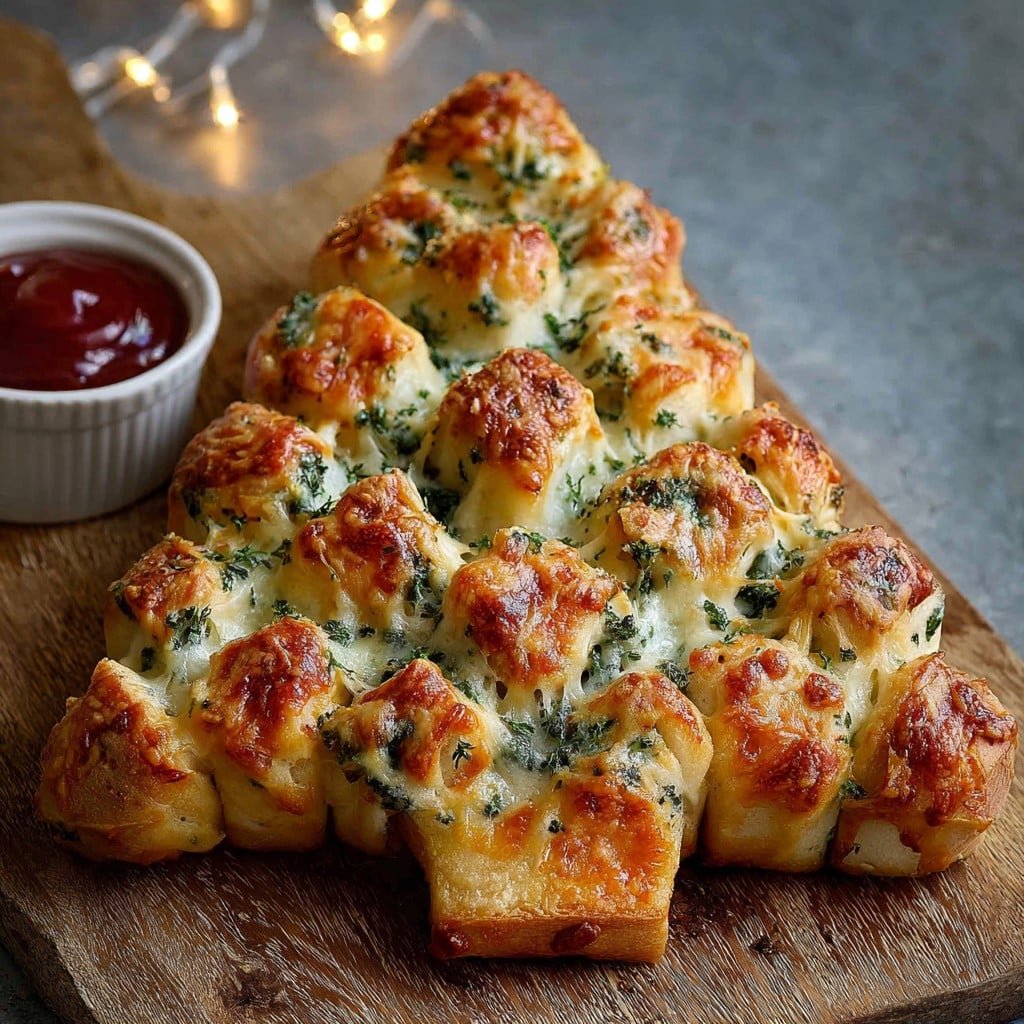
A Little Story (and a Laugh) Before We Begin
You know, the first time I made this Cheesy Christmas Tree Pull Apart Bread, my very skeptical uncle (the one who brings store-bought potato salad every year) said, “What in the world is that—bread or decoration?” He still reminds me of that every time the holidays roll around. But by the end, he was the first to grab the last piece (didn’t even share, mind you). I guess this one’s a new classic at our house, though I might have started a minor family feud over who gets the tree topper. Oh—remind me to tell you about the time I tried to make a snowman version; let’s just say, stick to trees.
Why You’ll Love This Festive Bread
I make this whenever I want something seriously fun but not fussy for a crowd (and okay, sometimes just for myself—nobody’s judging, right?). My family goes crazy for this Cheesy Christmas Tree Pull Apart Bread. It’s so snackable, I have to swat my brother’s hand away until it cools off. Plus, if you’re like me and slightly terrified of yeast dough, you’ll love that you can totally cheat with ready-made stuff. And if I can wrestle these little dough balls into a tree shape, honestly, anyone can (though the first attempt looked more like a lopsided cactus).
What You’ll Need (and Where You Can Wing It)
- 1 sheet of pizza dough (store-bought is fine; I’ve even used crescent roll dough when in a rush – my grandmother would probably roll her eyes, but it works!)
- 1 1/2 cups shredded mozzarella (though sometimes I sneak in a bit of sharp cheddar too, especially if I’ve got odds and ends in the fridge)
- 2 tablespoons Parmesan, grated (or just shake a bit from the green can—honestly, it’s delicious either way)
- 3 tablespoons unsalted butter, melted
- 2 cloves garlic, minced (I have, in sheer desperation, used the stuff in a jar. Don’t tell any serious cooks.)
- 2 tablespoons fresh parsley, chopped (or dried will do in a pinch, but fresh is nicer)
- 1/2 teaspoon dried Italian herbs (pizza seasoning, in other words)
- Salt & pepper, just a pinch
- Red pepper flakes (optional, if you like a little kick; my sister doesn’t, but I do)
- Olive oil for brushing
- Marinara sauce for dipping (here’s my go-to homemade recipe, but store-bought is totally fine)
Let’s Get to the Fun Part: Making the Tree
- Prep first! Preheat your oven to 375°F (190°C). Grab a baking sheet and line it with parchment paper, or just brush it with a glug of olive oil if you forgot to buy parchment (story of my life).
- Cutting & Stuffing: Roll out your dough into a sort-of rectangle (doesn’t need to be exact). Cut it into roughly 1 1/2 inch squares; I usually wing it with a pizza cutter. Place a pinch of shredded cheese onto each square, then fold them up into little dough balls, pinching the seams closed—don’t sweat if one or two leak, the crispy cheese bits are the best anyway.
- Shape your tree: Arrange the balls on the tray in a triangle/tree shape (start with one at the top, then two beneath, and carry on like that—it’s easier than it sounds, promise), with a row or two at the bottom for the “trunk.” Sometimes mine looks more like a bush, but once it bakes, it transforms like magic.
- Butter and season: Mix the melted butter, garlic, herbs, and a pinch of salt and pepper in a small bowl (I always spill a little butter at this point). Brush generously over the dough balls. Sprinkle over the Parmesan and any extra cheese because why not?
- Bake: Pop it in the oven for 18–22 minutes, or until golden brown and your kitchen smells like a little Italian trattoria (I open the oven at 15 minutes to peek—so tempting). Don’t worry if some cheese escapes. Honestly, that’s snack tax for the cook.
- Add some green: Sprinkle with fresh parsley and, if you’re feeling fancy, a few red pepper flakes. Let it cool just a couple minutes because (hot cheese alert!).
- Serve it up! Slide it onto a big platter, grab a bowl of warm marinara, and watch everyone demolish it within minutes.
What I’ve Learned (Sometimes the Hard Way)
- I used to overload the dough balls with cheese. Fun, but messy—less goo oozes out if you’re stingy (but who wants to be stingy with cheese?)
- If the bread’s a bit too crisp underneath, I find baking on the middle rack fixes it.
- Don’t forget the parchment—clean-up will haunt you otherwise. Trust me, I’ve ruined many a sponge scraping off baked-on cheese.
Variations I’ve Actually Tried
- Once, I tucked a sliver of pepperoni inside each dough ball. It was a hit and tasted like a Christmas pizza tree.
- Try brushing with pesto instead of garlic butter (especially if you’re in a rush—jarred stuff works, but it’s oilier)
- I tried swapping in feta instead of mozzarella for a Mediterranean vibe; honestly, not my fave, it got a bit crumbly (but maybe your family will like it?)
Gear Talk: What You Need, And What You Don’t
I always use a rimmed baking sheet because my oven is haunted by runaway cheese. No pizza cutter? A sharp knife, kitchen scissors, or even a not-too-dodgy butter knife will work (I’ve tried all three, who hasn’t?). Parchment is nice—but skip it if you don’t have any. Just use a little more olive oil and be ready to soak that tray later.

Storing Leftovers (If There Are Any…)
These are best the day you make them, but honestly, in my house, leftovers are as rare as a blue moon. That said, you can wrap them in foil and rewarm (oven for 10 minutes at moderate heat is better than microwave, which just turns it a bit rubbery). But I tend to think it’s even better the next day, cold, with coffee (I know, weird, but try it).
How We Serve It (Our Little Traditions)
We put it in the middle of the table and let everyone pull it apart with fingers. No knives, no plates, just hands (maybe not exactly dignified, but so much fun). My mum insists it hits the table just after the lights go on, so maybe make that your tradition too. And sprinkle extra cheese on top if you want it to really look like snow.
Pro Tips (Things I Messed Up So You Don’t Have To)
- I rushed stuffing the dough balls once and didn’t seal the bottoms—had a full-on cheese leak. Actually, it was still delicious, but kinda messy.
- Don’t skip preheating the oven. I did once, got impatient; the texture was just off. Be patient, I know, it’s tough.
- If your tree comes out a little, um, wonky, just call it “rustic” or “abstract”—nobody minds once they start eating.
FAQ: Real Questions I’ve Been Asked (Yes, Really!)
- Can you make it ahead of time? Yep—assemble and stuff your dough balls a couple hours ahead, cover, and pop in the fridge. Bake off just before serving.
- Does it freeze well? Well, I’ve frozen leftovers once (that’s how I know about the coffee snack). They reheat okay in the oven, but—don’t expect fresh-from-the-oven perfection.
- Can I double this? Sure! Use a big sheet pan or make two smaller trees. Or a forest, if you will.
- Can I use gluten-free dough? I haven’t tried, but my friend swears by the Schär brand. You might need to roll thicker balls since the GF dough can be fragile though.
- What if I don’t have Italian herbs? Just use some oregano and basil—or honestly, it’ll be tasty even if you skip them.
- Can I use vegan cheese? Haven’t tried it myself, but my cousin did with Violife and it worked (texture was just a bit different, obviously, but nobody complained!)
- Where do I find the best parchment paper? I like the stuff from King Arthur Baking—a bit pricier, but it doesn’t stick or curl up like the cheap stuff. Seriously worth it if you bake a lot.
And just a little side note—if you want to see what other people have done, check out the comments on the similar recipe over at The Kitchn. Loads of brilliant (and, sometimes, bonkers) ideas—almost as fun to read as to eat.
Ingredients
- 1 lb store-bought pizza dough
- 24 pieces mozzarella cheese (about 3/4 inch cubes)
- 2 tbsp unsalted butter, melted
- 2 cloves garlic, minced
- 1 tbsp fresh parsley, chopped
- 1/2 tsp dried oregano
- 1/4 cup grated Parmesan cheese
- 1/2 tsp salt
Instructions
-
1Preheat oven to 375°F (190°C). Line a large baking sheet with parchment paper.
-
2Divide pizza dough into 24 equal pieces. Flatten each piece and place a cube of mozzarella in the center. Pinch and roll each into a ball, sealing the cheese inside.
-
3Arrange the dough balls in the shape of a Christmas tree on the prepared baking sheet, with the seam side down.
-
4In a small bowl, combine melted butter, minced garlic, parsley, oregano, and salt. Brush the mixture over the dough balls.
-
5Bake for 22-25 minutes, or until golden brown and the cheese is melted. Sprinkle Parmesan on top and serve warm.
Approximate Information for One Serving
Nutrition Disclaimers
Number of total servings shown is approximate. Actual number of servings will depend on your preferred portion sizes.
Nutritional values shown are general guidelines and reflect information for 1 serving using the ingredients listed, not including any optional ingredients. Actual macros may vary slightly depending on specific brands and types of ingredients used.
To determine the weight of one serving, prepare the recipe as instructed. Weigh the finished recipe, then divide the weight of the finished recipe (not including the weight of the container the food is in) by the desired number of servings. Result will be the weight of one serving.
Did you make this recipe?
Please consider Pinning it!!


