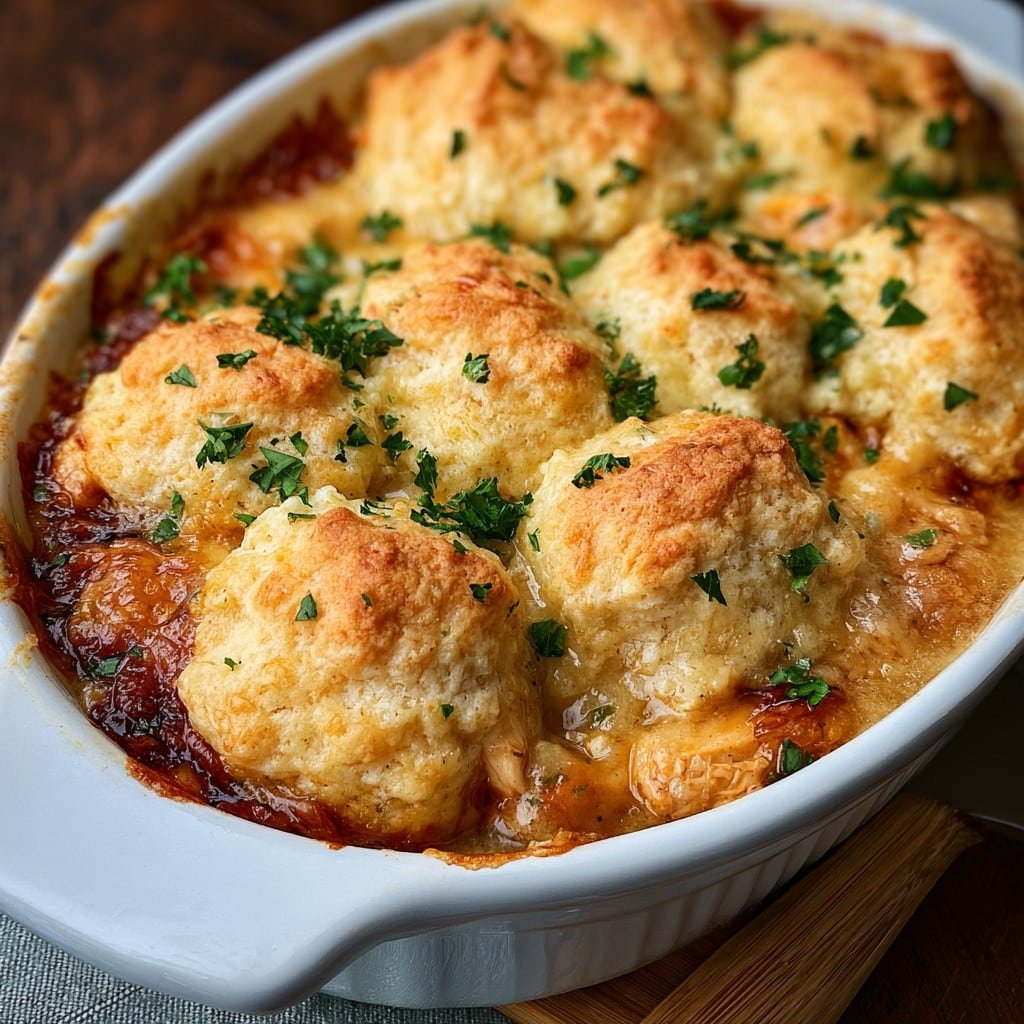
Honestly, This Cheddar Bay Chicken Cobbler Saved My Tuesday
Ever have one of those days where everything goes a bit cockeyed, and you just need a dinner that wraps you in a hug? Yeah, that’s how Cheddar Bay Chicken Cobbler came to live in my kitchen. I first made this on a random Tuesday when my fridge looked like a deserted wasteland except for leftover rotisserie chicken and (somehow) a box of Red Lobster Cheddar Bay biscuit mix. By accident or fate, dinner ended up being so good that my husband still brags about it at work potlucks—usually forgetting that he contributed by grating, like, three shreds of cheese. Anyway, I’ve tweaked it a million times since then, and while it still never looks super fancy, I think that’s part of the charm. Also? Cobbler for dinner just sounds cheeky.
Why You’ll Love This (Well, My Family Does Anyway!)
I make this Cheddar Bay Chicken Cobbler when I want something that feels both homey and, honestly, a little bit lazy to put together (no shame here). My family goes absolutely bonkers for the cheesy biscuit topping—especially my youngest who tries to pick off all the crispy edges. Sometimes I’ll make this when I have leftover chicken and need to clear out odds and ends from the veggie drawer (looking at you, wrinkly carrots). And if you’re like me and you’ve ever ruined a béchamel sauce, rejoice: there’s no fussy sauce here, just everything layered and baked. Oh, and if you’re not into precise chopping or measuring—join the club. Cobbler is forgiving like that.
The Stuff You’ll Need (And What You Can Swap)
- About 2 cups cooked chicken, shredded or chopped (use rotisserie—it’s a lifesaver; I’ve even used leftover turkey after Thanksgiving, which was weird but tasty?)
- 2 cups frozen mixed vegetables (I grab whatever’s in the freezer; sometimes I do just peas and carrots if that’s all I have. Fresh veggies work; just chop them small-ish!)
- 1 red bell pepper, chopped (optional, but my grandma swears every casserole needs something red… she was probably right)
- 1/2 cup diced onion (or a big handful, I won’t judge; sometimes I use green onions if that’s all I have)
- 2 cups chicken broth (low sodium, but honestly, whatever you have)
- 1/2 cup milk (whole, skim, or that brave little carton of oat milk—tried it, worked just fine, but the flavor was slightly off, so your mileage may vary!)
- 1 can cream of chicken soup (about 10.5 oz—cream of mushroom works as a swap; not traditional, but hey)
- 1 teaspoon dried thyme or herbs de Provence (though I forget this about half the time)
- 1/2 teaspoon black pepper
- For the biscuit topping:
- 1 package Cheddar Bay biscuit mix (I buy the Red Lobster one, but cheap store brands seem fine to me)
- 1/2 cup shredded cheddar cheese (the more, the merrier)
- 4 tablespoons melted butter (plus the seasoning packet that comes in the mix—though I once forgot and it was still tasty)
- 3/4 cup milk (or just enough to get the right batter texture; some days it takes a bit more, depends on humidity maybe?)
>
So, Here’s How I Throw It Together
- Preheat your oven to 400F (205C), or whatever your biscuit mix says if you’re feeling rebellious.
- Grab a 9×13 baking dish. Grease it up—Pam, butter, olive oil, whatever. In a pinch, I’ve literally wiped it with a paper towel dabbed in oil. It’s honestly fine.
- Dump in the chicken, frozen veggies, bell pepper, and onion. Spread them out so no one bite is shortchanged.
- Now, in a big bowl, whisk together the chicken broth, milk, cream of chicken soup, thyme (if you remember), and pepper until it’s as smooth as it’s gonna get. Don’t stress if you see a few lumps; they disappear in the oven.
- Pour that liquid goodness over everything in the dish. Don’t stir—trust me, just let those layers do their thing.
- Okay, for the biscuit magic: Toss the biscuit mix into a bowl. Add the cheddar, then pour in the melted butter and milk. Stir until just combined (overmixing equals chewy biscuits, ask me how I know), it’ll be thick, sorta like drop-biscuit dough.
- Spoon the biscuit dough all over the top in dollops. It looks weird and patchy, but that’s the charm. If you’re nervous, peek at Nagi’s method—her photos helped me get over stage fright about how it looks before baking.
- Bake (uncovered!) for 30-40 minutes, or until bubbly around the edges and golden on top. The time can really vary, probably based on mood or altitude or… oven funkiness. If it looks pale at 30, give it another 5-10. This is exactly when I sneak a taste of the biscuit from the edge with a fork—don’t tell the kids.
- If you want to be extra, brush a mix of the biscuit seasoning packet and a tablespoon of melted butter over the topping right when it comes out. My eldest says it makes it “restaurant-y,” which is a compliment, I think?
Smudged Apron Notes from My Kitchen
- Don’t worry if the biscuit topping looks like clouds floating in soup halfway through baking. Every time, I panic. Every time, it sets up perfect by the end.
- I used to stir the soup mixture into the chicken but—honestly—it made zero difference aside from an arm workout no one asked for.
- If you forget to thaw the veggies, it’s fine. Maybe bump up the oven time by 5-ish minutes. No disasters so far.
Variations I’ve Actually Tried (And a Flop)
- I’ve done this with rotisserie turkey after the holidays—wildly good, just don’t use smoked turkey unless you love bold flavors.
- Added cooked bacon once. Didn’t hate it, but it kind of took over the whole thing. My youngest said it was a “bacon bomb.” Not sure it was a compliment?
- On a dare (and running low on chicken) I tossed in cooked shrimp. Eh. Tastes alright but definitely not something I’d repeat unless the pantry is desperate. Or maybe if I was cooking down by the coast.
- Sometimes I top it with extra herbs or switch up the cheese—gruyere is decadent if you’re feeling posh.
What You’ll Need for Equipment (With a Cheat Code)
- A 9×13 baking dish (metal, glass, even a big oven-safe skillet works—used my old cast iron once, turned out real nice)
- Mixing bowls (big for the soup, one for the biscuit dough)
- If you don’t have a whisk, a big fork or even a clean hand works. I’ve resorted to that more times than I’d like to admit when the dishwasher’s full
- Measuring cups, but honestly, I eyeball that cheese every single time

Storing Leftover Cobbler
Scoop leftovers into a container or just cover the dish and shove it in the fridge (no judgment). It keeps for about 3 days, but honestly—at my place, it’s usually vanished by breakfast the next morning. If you reheat, pop a splash of broth or milk over the top and it’ll perk right up. Freezes okay, though the biscuit topping gets a little… chewy? Not my favorite, but better than nothing when you’re desperate.
How We Serve It Up (And One Silly Tradition)
I like this best in big, deep bowls with a side of salad if I remember, and usually, there’s a bottle of hot sauce somewhere on the table (thanks to my uncle shouting “Put fire on it!”). Oddly enough, my youngest insists we eat it while watching reruns of The Great British Bake Off—no idea why, but who am I to judge?
Lessons from My Kitchen Blunders (aka Pro Tips)
- I once tried cranking the oven higher to “speed things up”: total disaster. The biscuit looked done but was basically raw underneath. Take it slow, trust the process.
- If you use homemade biscuits, the topping will spread more. Good, but it soaks up more liquid and gets a little dense. Honestly, use the mix—the shortcut is worth it here.
- Don’t overmix the biscuit dough! If it starts looking like bread dough, you’ve gone too far. Lumpy is good.
Burning Questions (People Actually Asked Me These!)
- Can I use raw chicken instead of cooked? I wouldn’t, honestly; it probably won’t get fully cooked in time (and the biscuit part might burn). If you must, dice it small and maybe sear it first?
- What’s the best veggie mix? There’s no best! I like peas, carrots, and corn, but once I threw in broccoli and regretted it. Just go with what you like.
- My cobbler is soupy—why? Happens to me, too, if I get overzealous with the broth. Or maybe if the veggies have more water. Try letting it sit 10 minutes after baking—it thickens up a bit. If it’s still runny, well, serve it with a slotted spoon (no one will notice).
- Can I make this gluten free? I tried using a gluten free biscuit mix. Tasted fine, just didn’t rise as much. Also, gluten free cream soups are trickier to find but Campbell’s has some now.
- Why does my topping get soggy? If you cover it while baking (don’t!), or if the filling’s extra-wet, it can go a little mushy. Just bake it naked. That’s probably the key, now that I think about it.
If you want more cozy casserole ideas, check out Southern Living’s casserole guide. Or honestly just call your grandma—she probably has better advice than I do. Now, who’s hungry?
Ingredients
- 2 cups cooked, shredded chicken
- 1 cup frozen mixed vegetables
- 1 can (10.5 oz) condensed cream of chicken soup
- 1/2 cup milk
- 1/4 cup unsalted butter, melted
- 2 cups Cheddar Bay biscuit mix
- 1 cup shredded cheddar cheese
- 2/3 cup milk (for biscuit topping)
- 1/2 teaspoon garlic powder
- 1/2 teaspoon dried parsley
Instructions
-
1Preheat oven to 375°F (190°C). Grease a 9×13-inch baking dish.
-
2In a large bowl, combine cooked shredded chicken, frozen mixed vegetables, condensed cream of chicken soup, 1/2 cup milk, and melted butter. Mix until well blended.
-
3Pour the chicken and vegetable mixture into the prepared baking dish and spread evenly.
-
4In a separate bowl, mix Cheddar Bay biscuit mix, shredded cheddar cheese, garlic powder, parsley, and 2/3 cup milk until just combined.
-
5Spoon the biscuit mixture evenly over the chicken layer, spreading gently to cover.
-
6Bake for 40 minutes, or until the biscuit topping is golden brown and cooked through. Let cool for a few minutes before serving.
Approximate Information for One Serving
Nutrition Disclaimers
Number of total servings shown is approximate. Actual number of servings will depend on your preferred portion sizes.
Nutritional values shown are general guidelines and reflect information for 1 serving using the ingredients listed, not including any optional ingredients. Actual macros may vary slightly depending on specific brands and types of ingredients used.
To determine the weight of one serving, prepare the recipe as instructed. Weigh the finished recipe, then divide the weight of the finished recipe (not including the weight of the container the food is in) by the desired number of servings. Result will be the weight of one serving.
Did you make this recipe?
Please consider Pinning it!!

